Measuring Instructions
Radio Belt Measuring Instructions
To properly measure for your custom fit Radio Belt you will need a flexible tape measurer, a piece of webbing or if you have access to one a radio belt.
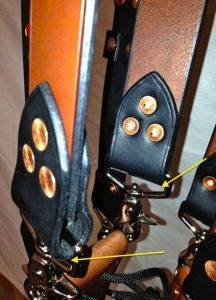
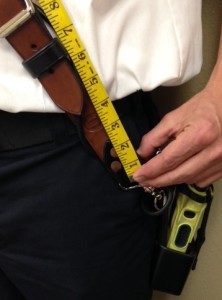
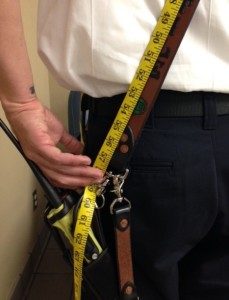
Measuring with a radio belt: If you have access to a radio belt. Put it on and adjust the belt to how you like to wear it. When you are happy with your adjustment, take the tape measurer and place it on the front side of the belt at the point where the leather wraps around the snap (see picture below with yellow arrows). Take the running end and drape it over your shoulder following the radio belt. Your end measurement will be at the point where the leather wraps around the snap. This will be your belt length.
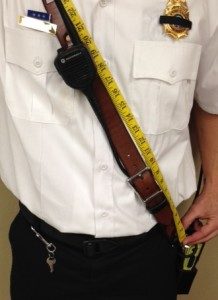
For the shoulder mic, determine the location where you like to wear your shoulder mic and then measure from the same starting point on the front of the radio belt to the center point of the shoulder mic. This will be your shoulder mic measurement.
Measuring with a piece of webbing: Take the piece of webbing and place one end at the location where you would like to have your radio holder. Drape the running end of the webbing over your shoulder and back down to the same location as the start point for the webbing. Measure from the beginning of the strap to where the straps meet and that will be your total length.
For the shoulder mic, determine the location where you like to wear your shoulder mic and then measure from the same starting point on the front of the strap to the point where you like to wear your mic.
Example: You can see that the total length of this belt is 57-1/2” and the mic. Measurement is 19” on-center
***** When placing a Radio Belt order, it is important to let me know which method you used to measure for your Radio Belt*****


Truck / Axe Belt Measuring Instructions
To properly measure for your custom Truck/Axe belt you will need your Bunker Gear Jacket and a flexible measuring tape or piece of webbing.
1. Don your jacket
2. Wrap the measuring tape or webbing around your waist to the point where it is snug but not uncomfortable.
3. Your total length will be the point where the measuring tape ends meet or the length of your piece of webbing.
“X” Style Suspenders Measuring Instructions
To properly measure for your custom “X” style suspenders you will need your bunker pants and a flexible measuring tape or piece of webbing. If you currently have “X” style suspenders, leave them on and adjust them to your liking.
1. Don your pants and adjust to your preference.
2. Measure from the outside attachment point on the back, right side of your pants and bring the tape or webbing over your left shoulder to the inside attachment point on your pants. This will give you your total length.
3. Next, measure from the same starting point on the back of your pants to the middle where the two straps cross. This number will be your back cross connection point.
“H” style suspenders Measuring Instructions
To properly measure for your custom “H” style suspenders you will need your bunker pants and a flexible measuring tape or piece of webbing. If you currently have “H” style suspenders, leave them on and adjust them to your liking.
1. Don your pants and adjust to your preference
2. Measure from the back right or left connection point on your pants then over the same side shoulder to the front connection point on the same side as the back. This number will be your total length.
3. Next, measure from the same connection point on the back to the center of the “H” cross piece that connects the two suspenders on the back. This number will be your on-center mark for the “H” piece.
4. The last measurement will be the total length of the “H” piece. Measure the total length of the “H” piece from end to end.
Duty Belt Measuring Instructions
To properly measure for your custom Duty belt you will need a measuring tape. If you currently have a duty belt that fits, you can get the measurement you need directly off this belt.
1. If you have a duty belt you currently use, measure from the end of the buckle to the hole on the belt that you currently use. This will give you your total length. Do not worry if this is the last hole or the first hole on your belt. The measurement you provide me will be the new center hole on your new custom belt and you will have 3 holes to move forward or back for extra adjustment
2. If you do not currently have a duty belt. While wearing your uniform, use a flexible measuring tape or piece of webbing and measure around your waist. This will give you your total length.
Helmet Band Measuring Instructions
To properly measure for your custom Helmet Band you will need a flexible measuring tape or piece of webbing.
1. Measure your helmet around the bottom of your helmet where the crown and the brim meet. Make sure not to include to Leather front if your helmet has one attached. This will give you your total length.
Dog Collar Measuring Instructions
To properly measure for you custom Dog Collar you will need a measuring tape. If your dog currently wears a collar, we can use this to get an accurate measurement.
1. Adjust your current collar to the point where it is snug on your pet but still spin freely. The goal is to adjust the collar to where it cannot be pulled off.
2. Measure from the end of the buckle to the hole on the belt that your pet currently uses. This will give you your total length.
3. If you have an adjustable collar you can measure from end to end
4. If you have no collar at all for your pet now, use a flexible measuring tape or piece of webbing to measure around your dog’s neck. Remember, we want it to be snug, spin freely and not be able to be pulled off.